Teams is Microsoft’s take on group chat in response to the booming market led by Slack. Microsoft Teams is an immensely powerful application that enhances teamwork through enriched collaboration and team communication. Unlike the other Office productivity applications that have a legacy to preserve and millions of users to consider, Teams is built from scratch with the modern workplace in mind.
This also means that Microsoft Teams introduces a new work behavior, that a surprising number of people in the tier might find difficult. Also, if you haven’t already moved, migrating from skype for business to Microsoft Teams will be the best decision of your life. Teams is loaded with features that are specially designed to improve collaboration. While going back and forth between the channels, chats, mentions, and likes or an important email notification or the barrage of alerts can easily miss the eye.
It is essential to make sure that you don’t miss anything of importance, and you don't need to have extensive Office Skills to ensure that. Microsoft Teams offers several ways to access, receive, and manage the notification icon. These settings include how, when, and where your notifications appear, custom settings for channels and private messages, appearance, and alert sounds, turning off specific messages, and so on. Here are some quick tips and tricks that you could use to access notification settings if you’re not getting chat notifications and utilize all the powerful Microsoft Teams Notifications features.
Default Notification Settings
If you decide not to change anything in your Microsoft Teams Notifications, you will be receiving both desktop notifications and activity feed alerts for mentions, direct messages, and mentions in the channels and teams that your part of. If you want to configure a custom settings option, read.
Hidden Teams & Channels
If you’ve been using Teams for some time, you may be familiar with marking channels as your Favorite to receive native notifications. What used to be “Favorite” is now “Show”. Along with replacing channel “Favorite” with “Show”, the “Follow” option has now been replaced with “Channel notifications”. This allows you to manage specific channel notifications settings and the notification option that includes message preview.

Types of Priority Notifications
Let's get a little into how each of the three Microsoft Teams Notification types work.
Activity Feed and Chat Counts
The activity notifications feed is displayed at the top of your Teams menu. In this notification type, an activity count is displayed to indicate recent activity. Just below the activity feed is your chat. This is where your group and one-on-one conversations happen. A chat count is displayed as you receive a new, unread message.
Desktop Banner Notifications
Desktop Notifications are also known as banner notifications. On Windows, a notification banner will show in the bottom right corner of your screen, then move to the Action Center. On a Mac, these show up in the top right corner of your screen, then move to the Control Center.
If you would like notification emails sent directly to you, please make the following changes in your main Teams notification settings (Profile>Settings>Notifications):
After this, users will be able to send and receive unlimited urgent messages with priority notification.
Customize Your Notification Settings
Notification settings can be changed for the entire Teams application, specific channels, and conversations on your apps or browser tab.
Manage Microsoft Teams Notifications Settings
Teams’ application-wide notification settings can be found under your profile. To view or change settings, click on your profile picture in the top right corner of Teams, then Settings > Notifications. In this window, you can customize the settings to fit your needs on your mobile app.

Manage Channel Notifications
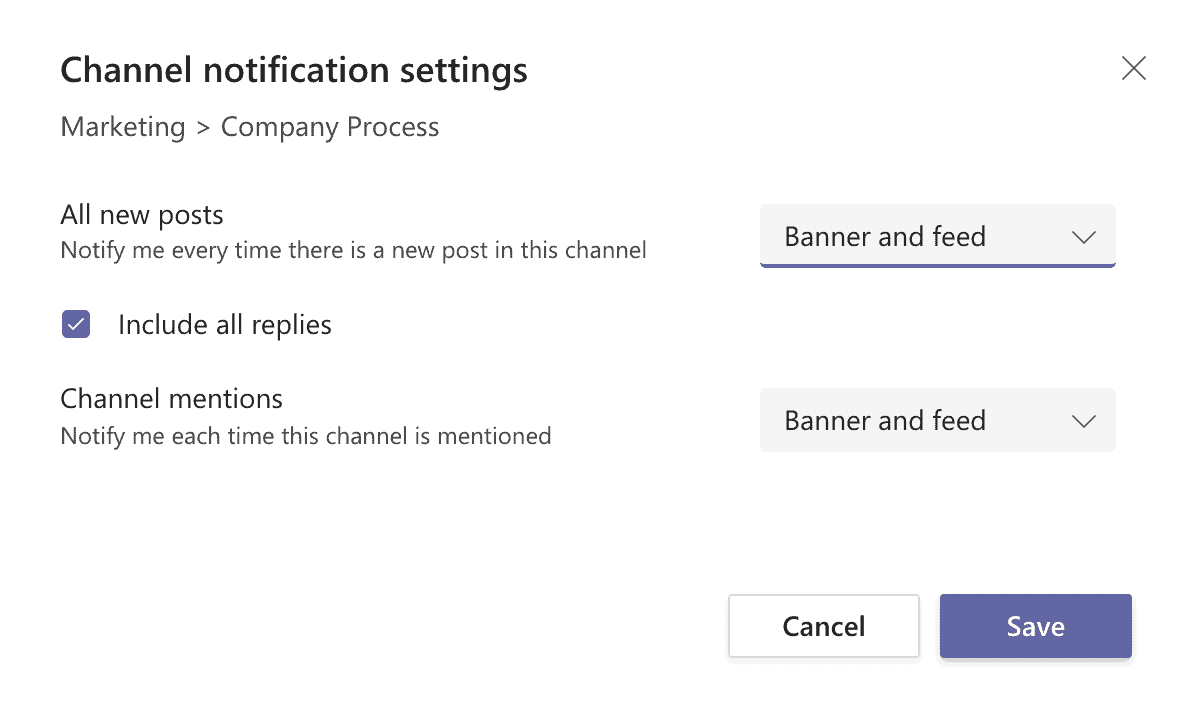
To view or update messages in channels and their notifications, click on the 3 dots next to the channel name, then click on Channel notifications on your Teams list. This is what the default settings for channel notifications look like:

Manage Conversation Notifications
If you decide you no longer wish to receive notifications for a specific conversation, it's not an issue because notifications can be turned off. Go to the beginning of a conversation in a channel, then go to the top right corner of the message and select More options > Turn off notifications from the dropdown menu. Notifications for this conversation can be turned back on if you change your mind.
Manage Notification Sounds
To turn off or turn on notification sounds, toggle on Play sound for incoming calls and notifications.
Turn off Notifications for Specific Conversations
In a channel conversation, go to the top right corner of the original message and select More options > Turn off notifications. As with muting a chat, turning off notifications to a channel conversation will stop updates for that specific conversation.
Note: You'll still receive notifications if someone directly @mentions you.
Manage Microsoft Teams Notifications on Mobile Devices
Things are slightly different on Teams' mobile app. One of the first things you'll want to do is choose whether you want to receive notifications on your phone always or only when you're not active on the desktop. (You're considered inactive after 3 minutes of inactivity.) The other thing you'll want to make sure to set are your quiet hours.
To do this, you would have to go to More in the top left corner of the mobile app > Notifications > Quiet hours, and you're all set!
Getting Notified in the App and on Desktop
You can choose whether a message preview shows on desktop by turning the toggle on for "Show message preview". You will have to select "Banner and feed" to receive notifications as both a desktop notification and as an alert in Activity.
Note: In Windows, notification banners will show in the bottom right of your screen. In macOS, they show in the top right.
Turning off Notifications During Meetings & Calls
You can do this by selecting 'Edit' next to Meetings and Calls and then turn the toggle on for Mute notifications during meetings and calls.
Note: The dropdown settings under Meeting started notification and Meeting chat notifications aren't affected by choosing to mute notifications during meetings and calls. You can modify those separately.
Microsoft Teams Monitoring and Alerting
The new monitoring and alerting capabilities in Microsoft Teams collaboration tool are now available in the Teams admin panel. You can use different sets of rules that are provided under the Notifications & Alerts section in the Teams admin center to help you monitor Teams capabilities and receive alerts. For instance, you can actively monitor the health and status of your Teams devices such as IP Phones, collaboration bars, and others if they unexpectedly go offline.
Your organization can use Teams monitoring and alerting to do the following items:
How to Manage Monitoring and Alerting
You must be a global admin in your Microsoft 365 or a Teams service admin to configure these alerting rules. See Use Teams administrator roles to manage Teams to learn more about role-based access in Teams and which reports each admin role can access.
Follow these steps to configure rules:
- Sign into the Teams admin center.
- From the left navigation, select Notifications & alerts.
- Choose the rule you want to configure from Rules.
Obviously, if at any point you think you need help managing your Microsoft Teams Notifications, you can book a strategy call with us and we’d be delighted to walk you through the process.
Last Updated 1 year ago
